本文共 3753 字,大约阅读时间需要 12 分钟。
参考
下面介绍工具的安装,其实写这个工具的作者已经描述得很详细,但是还是会出一些问题。安装过程中穿插一些小提示,有些可以不去管它,按照步骤一步步输入命令就行,下面我列出我觉得必要的步骤,大家一步步照着输到终端就行。
- 1. Prerequisites
-
- sudo apt-get install gcc make linux-headers-$(uname -r) git-core
-
- 2. Build and Install the Modified Wireless Driver
-
- CSITOOL_KERNEL_TAG=csitool-$(uname -r | cut -d . -f 1-2)
-
- git clone https://github.com/dhalperi/linux-80211n-csitool.git
-
- cd linux-80211n-csitool
-
- git checkout ${CSITOOL_KERNEL_TAG}
-
- make -C /lib/modules/$(uname -r)/build M=$(pwd)/drivers/net/wireless/iwlwifi modules
-
- sudo make -C /lib/modules/$(uname -r)/build M=$(pwd)/drivers/net/wireless/iwlwifi INSTALL_MOD_DIR=updates modules_install
-
- sudo depmod
-
- cd ..
-
- 3. Install the Modified Firmware
-
- git clone https://github.com/dhalperi/linux-80211n-csitool-supplementary.git
-
- for file in /lib/firmware/iwlwifi-5000-*.ucode; do sudo mv $file $file.orig; done
-
- sudo cp linux-80211n-csitool-supplementary/firmware/iwlwifi-5000-2.ucode.sigcomm2010 /lib/firmware/
-
- sudo ln -s iwlwifi-5000-2.ucode.sigcomm2010 /lib/firmware/iwlwifi-5000-2.ucode
-
- 4. Build the Userspace Logging Tool
-
- make -C linux-80211n-csitool-supplementary/netlink
这时,安装工作结束了。如果你是按照网上的安装教程一步步执行每条命令,最后会看到你的WiFi图标下会显示设备未托管,并且连不上网,不要慌张,因为需要手动配置网络。如果不想用命令行配置,安装时不使用任何Tip就行。但是建议手动配置,功能更强大,我也会提供相应配置脚本。现在就可以讲如何使用该工具,如果是AP模式,就很简单,运行下面的脚本就行。这种情况需要一个没有设置密码的路由器,当然路由器要支持802.11n协议。参数只有一个,那就是路由器WiFi名。
- #!/bin/bash
- modprobe -r iwldvm iwlwifi mac80211
- if [ "$#" -ne 1 ]; then
- echo "Usage: wifi_connect <SSID>!"
- exit 0
- else
- id=$1
- fi
- ifconfig wlan0 up 2>/dev/null 1>/dev/null
- while [ $? -ne 0 ]
- do
- modprobe iwlwifi connector_log=0x1
- sleep 1
- ifconfig wlan0 up 2>/dev/null 1>/dev/null
- done
-
- iw dev wlan0 connect $id && \
- dhclient wlan0 && \
- echo "success!"
连接上ap后,输入iwconfig命令查看连接状态。确保无误后运行log_to_file记录CSI,然后在另一个终端输入ping命令,如下:
sudo ping 192.168.1.1 -i 0.05
ping后面接的是网关地址,i后面的参数是ping时间间隔,单位是秒。间隔小于0.2s需要root权限。
除了ap模式,CSI Tool还提供monitor模式的用法。监听模式不需要路由器,但是至少需要2台安装Intel 5300网卡的电脑,它比ap模式更加稳定,可以发送指定数量的包,可以设置发送包之间的间隔,以及信道和带宽。
- injection模式启用需要编译。需要下载安装下面的一些文件
- 具体步骤如下:
-
- sudo apt-get install libpcap-dev
-
- git clone https://github.com/dhalperi/lorcon-old.git
-
- cd lorcon-old
-
- ./configure
-
- make
-
- sudo make install
-
- cd linux-80211n-csitool-supplementary/injection
-
- make
-
- 使用:
-
- 接收方:
-
- ./setup_monitor_csi.sh.sh 64 HT20
-
- sudo ../netlink/log_to_file log.dat
-
- 发送方:
-
- ./setup_injection.sh 64 HT20
-
- sudo echo 0x4101 |sudo tee /sys/kernel/debug/ieee80211/phy0/iwlwifi/iwldvm/debug/monitor_tx_rate
-
- sudo ./random_packets 1 100 1
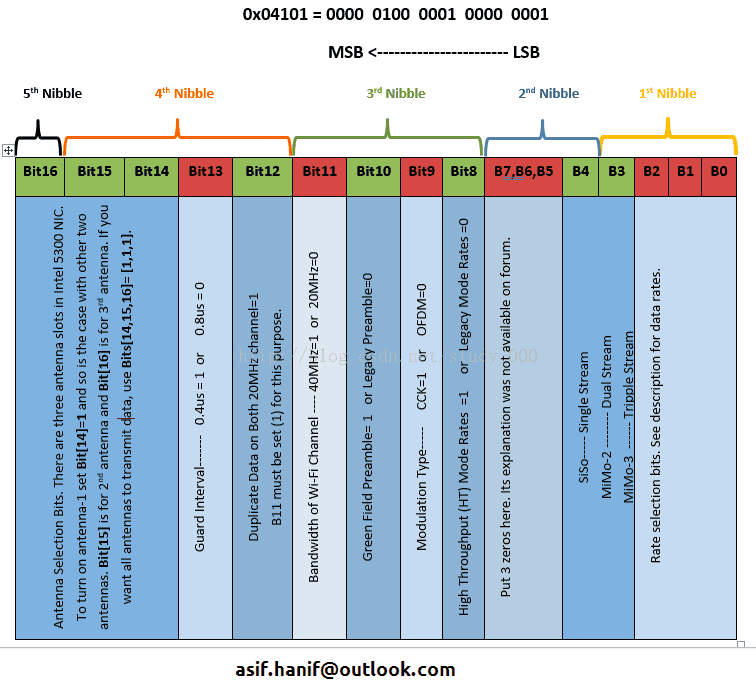
需要注意的是最后2行,0x4101是对发送速率的选择,需要根据自己的情况设置,每一位 的含义见下图。最后一行就 是发送方发包命令,有4个参数,第一个是包的数量,第二个 是包的长度,第三个是模式,默认1就行。最后一个是 发包间隔,单位us。 由于原来的setup_monitor_csi和setup_inject两个脚本运行会出现各种问题,所以需要修改一下,将代码替换到源文件就可以了。下面是两个脚本的代码:
setup_inject - #!/usr/bin/sudo /bin/bash
- sudo modprobe -r iwldvm iwlwifi mac80211
- modprobe -r iwlwifi mac80211 cfg80211
- modprobe iwlwifi debug=0x40000
- if [ "$#" -ne 2 ]; then
- echo "Going to use default settings!"
- chn=64
- bw=HT20
- else
- chn=$1
- bw=$2
- fi
- ifconfig wlan0 2>/dev/null 1>/dev/null
- while [ $? -ne 0 ]
- do
- ifconfig wlan0 2>/dev/null 1>/dev/null
- done
- iw dev wlan0 interface add mon0 type monitor
-
- ifconfig wlan0 down
- while [ $? -ne 0 ]
- do
- ifconfig wlan0 down
- done
- ifconfig mon0 up
- while [ $? -ne 0 ]
- do
- ifconfig mon0 up
- done
-
- iw mon0 set channel $chn $bw
setup_monitor_csi - #!/usr/bin/sudo /bin/bash
- sudo modprobe -r iwldvm iwlwifi mac80211
- modprobe -r iwlwifi mac80211 cfg80211
- modprobe iwlwifi connector_log=0x1
- if [ "$#" -ne 2 ]; then
- echo "Going to use default settings!"
- chn=64
- bw=HT20
- else
- chn=$1
- bw=$2
- fi
-
- iwconfig wlan0 mode monitor 2>/dev/null 1>/dev/null
- while [ $? -ne 0 ]
- do
- iwconfig wlan0 mode monitor 2>/dev/null 1>/dev/null
- done
-
- ifconfig wlan0 up 2>/dev/null 1>/dev/null
- while [ $? -ne 0 ]
- do
- ifconfig wlan0 up 2>/dev/null 1>/dev/null
- done
-
- iw wlan0 set channel $chn $bw